Saturday, September 7, 2019

Armada Fleet Battle, part 8

This is the eighth and final post about my Star Wars Armada full collection fleet battle.

***

Closing Thoughts

Empire
The top of turn 4 was truly the make or break point in the game. If the reeling Independence did not finish off the mortally wounded Executor, it is likely that the Super Star Destroyer would have killed Independence (a 685 point swing!) and also heavily damaged both Home One and Profundity. Probably not enough for the win, as Executor was too far gone to save by that point.

I needed to move my ISDs up very quickly. The SSD starts out so far ahead of the rest of the fleet that the poor front arc is basically fighting it’s own battle, far from support. The slow VSDs could be left in the dust as the ISDs race forward to the SSD’s bow to slug it out. That might cause a deadly traffic jam in the hordes of Rebel ships found up there. Chimaera rocketed forward at speed 3 (right into a buzzsaw, as it happened), but Devastator inched along at speed 1, allowing the Rebels to divide and conquer. Going slow also helped allow Devastator to be shot in the rear arc at least 5 times.

As for the pregame plan, the VSDs barely moved and the Arquitens cruisers did not help with flank protection. A whole host of fast Rebel ships were in the Imperial backfield by Turn 3. The Raiders went forward fast, but were basically ignored until the end and didn’t do too much. I suspect the Arquitens need to be closer to the ISDs to effectively protect the rear; not sure what the Raiders should do. Perhaps a bigger dose of anti-squadron operations.

I was also not happy with my usage (or lack thereof) of the squadrons held within Stronghold and Executor. I envisioned letting them get a safe ride deep into enemy territory, but that really didn’t materialize. It would probably have been better to overwhelm the Rebels with sheer numbers right from the outset. The nature and placement of fighter screens is still something I am thinking about. As an engaged squadron can’t usually choose to attack a ship, even if they’re in range, I suppose there is no need to send the screen fighters across the board. They could hover in a mass, close around the ship they’re protecting, ready to engage approaching bombers.

I was pleased with the concept and operation of the Lambda-class shuttles (with Relay) when paired with Boosted Comms. That really allowed for a very wide-ranging squadron game. The results might have been poor, however, as the spread out Imperial squadrons took a ferocious beating early on. I am still debating as to whether it was a good thing to “set the line” for the squadron fight so far out in front of the ships. On the good side, few if any B-wings got to tee off against a capitial ship! Conversely, I don't think my TIE Bombers got any great massed shots in, either. Perhaps having the fighter screen closer in would be best.

TIE interceptors were fun to fly fast and far across the board. The Snipe ability of Saber Squadron picked off a B-wing squadron for the game’s first kill.


Rebels
I’m not sure things could have worked out better! A decisive victory against bigger, scarier ships. Wave after wave of damage belted into the Executor’s front arc: ten ships plus a number of squadrons over the 2nd through 4th turns. Add to that at least three more attacks by ships in Executor’s other arcs and you have a murderous situation. Liberty paid dearly for leading the way against the SSD, as I suspected she would.

As we all know, Rebel squadrons are made of tougher stuff than those flimsy TIE fighters. I was very pleased with the performance of all Rebel fighters. Perhaps the stars of the squadron game were the X-wings, equally adept at protecting Y- or B-wings (with Escort) as they were at fighting ships in a pinch (with Bomber). They excelled against TIE/ln squadrons, as we’d expect. The A-wings were great fun for engaging TIE bombers way back behind enemy lines, daring them to shoot the A-wings on their turn, as Counter 2 was waiting for the reply.

Going exactly to plan was the action of the pride of Mon Cala, the Profundity, Independence, Liberty, and Home One. Each of these heavy hitters dealt a boatload of damage to the Imperials. Liberty died doing what she loved, and Independence was not far from the same glorious fate.

More than just honorable mentions for the excellent MC30cs, the fast CR90s, and the versatile Nebulon-Bs. Can’t say I was upset with the performances from the Hammerheads or the Peltas, either. Both seem like compromise ships, and both were slow, but they were also tough.


***

I am surprised the final points turned out so lopsided. I was thinking it was a close-run affair throughout most of the game. I am eager to digest this game a bit more (and brush up on the two pages of notes about what I did wrong, rules-wise, throughout this marathon game), then dive into playing some more at a more reasonable points total.

Armada Fleet Battle, part 7

This is the seventh post about my Star Wars Armada full collection fleet battle.

***

Turn 4
Do or die time for Independence. Either they will succeed in destroying Executor or they will be blown up. The MC80 could only get one arc on the Super-class, so it decided to do an Ackbar assisted double broadsides: right arc versus Executor, left arc versus Warlord. Both long range shots.

Boom, boom!

In what was the toss-up must win moment of the match, the pride of Mon Cala came through. Emperor Palpatine was dead, as was the last battered Victory-class on the Rebel left flank!

Seeing his master vaporized made Lord Vader, still aboard the last Imperial vessel of note, Imperial Star Destroyer Devastator, enraged. Filled with vengeance, the mighty craft unloaded at point blank range against Redemption and Yavaris. Both weathered the storm with just a few less shield points.

Not to be outdone by her heavy hitting sister ship, the as-yet-unscathed Home One let loose a Ackbar powered double broadside of her own: deeply wounding Devastator and one-shotting Impetuous, a nearby Imperial Raider!

It was over, but Devastator would not yield. The MC30c Providence blasted a double arc combo platter into Vader's ship to send him the way of the Emperor.

The Rebel Alliance had won a landslide victory!

The state of play after Devastator's destruction. End of game.


End of Turn 4 Score

Rebels       1601
Imperials   590


***

The last hyperdrive-equipped Imperial ships made the jump to hyperspace, one by one, reeling from the shocking losses they'd just suffered at the hands of the Rebels. The Empire was finished...it was just a matter of time. Dozens of TIE pilots were left abandoned in among the Imperial wreckage.

The Imperial Remnant, sole survivors of an epic collapse

Armada Fleet Battle, part 6

This is the sixth post about my Star Wars Armada full collection fleet battle.

***

Turn 3
With Liberty in a very tenuous position, right up against a wounded and angry Executor, I opted to have Liberty open the turn (they likely wouldn't last through the next Imperial activation).  A scathing double arc unloading further damaged the Super-class star destroyer.

The very next activation, Executor replied, emptying two arcs into Liberty, destroying it, and one arc into Independence, gravely injuring the MC80. The Victory-class Warlord, formerly Chimaera's wingmate, destroyed the Nebulon-B Salvation. Devastator, on the other side of the battle, killed the Pelta-class Refuge. Profundity continued its winning ways with a Ackbar-assisted double broadside, wrecking the second space station and damaging Warlord as it flew past. Dominator, Devastator's wingman, had a productive effort, killing both Consonance (the Sphyrna-class Hammerhead) and the CR90 Dodonna's Pride. In response, the MC30c Providence destroyed the Arquitens-class Centicore in a 1-shot drive-by, as it rounded the corner on the Rebel right flank!

The Nebulon-B Redemption killed the Victory-class Corrupter, and Tantive IV finished off the Victory-class Dominator.

By the end of this turn, the Executor had 29 hull damage (out of a maximum of 33). Many Rebel ships were heavily damaged as well. The mortally wounded Independence found itself in a duel. Kill or be killed versus Executor

Independence, you are go for double broadsides next turn!

Turn 3 was brutal. Liberty and a pair of Victory-class led the losses.

End of Turn 3 Score

Rebels       1030
Imperials   590

Armada Fleet Battle, part 5

This is the fifth post about my Star Wars Armada full collection fleet battle.

***

Turn 2
Emperor Palpatine's plan was unfolding just as he had foreseen. He declared that any Brace tokens spent this turn by Rebel ships will be discarded rather than exhausted.

Grand Admiral Thrawn gave a Concentrate Fire command dial for all Imperial Captains to use. 

Opening the turn, Profundity pulled off a sweet drive by, unloading its front arc at point blank range into the Chimaera, then zipping right past, out of the Imperial's front arc. Executor scorched Liberty and Admonition, the two Mon Cala ships rocketing along it's side. Hero of the Rebellion Wedge Antilles met his end, killed by Soontir Fel.

The quick Rebels made it to the turn, unfazed by the peppering shots from the twin Arquitens gate keepers and the Victory-class Dominator. The close-in work on the Rebel left got a bit too close when the Victory-class Warlord rammed the Nebulon-B Salvation. Back on the Rebel right, in front of Devastator, the Nebulon-B's Redemption and Yavaris vaporized station 1 (along with an assist from the Sphyrna-class Hammerhead Consonance).

Chimaera's angry retort against Independence and Profundity was too little, too late. The Pelta-class Haven emptied two arcs into Thrawn's front, then Y-wings from Independence finished the job for the first ship kill of the day. A big one, too, taking out an Imperial Grand Admiral!

Independence went next, unloading two arcs into Stronghold, the Quasar Fire-class cruiser carrier. Good thing the vessel had released its fighters earlier in the turn, as the assault proved too much for the fragile craft and it, too, exploded.

The rest of the turn was a Rebel free-for-all, mostly against Executor, who had 8 hull damage after the beatings were completed. Rebel losses remained light, so far.

The pile-up in front of Devastator, where the station used to be...


Home One continues into double broadsides position as all hell breaks loose around station 1


Liberty versus Executor on left, Independence and Profundity have won the right

Rebels turning the corner on the Imperial left flank

Casualties from Turn 2; notably Chimaera
End of Turn 2 Score

Rebels       413
Imperials   59

Armada Fleet Battle, part 4

This is the fourth post about my Star Wars Armada full collection fleet battle.

***

Turn 1
The Rebel speedsters took off first, rocketing across the board. In response, the twin Arquitens prepared for a broadside blocking maneuver. They hoped to, along with the Victory-class star destroyer Dominator, secure the far left edge of the Imperial line.

Squadrons raced toward each other, with the Imperial starfighters traveling furthest and generally setting the skirmish line well onto the Rebel half. Good idea? Perhaps not, in retrospect.

Grand Admiral Thrawn assisted the squadron deployment by spending a Squadron command dial for use by all Imperials. The Lambda-class shuttles spread out, providing for relaying commands to the TIEs down range. The first hit was scored by a TIE fighter squadron from Dominator, who put some damage onto a B-wing squadron from Home One. The Rebels didn't escort the heavy assault starfighters correctly, I guess. The first kill came soon thereafter, when Saber Squadron sniped that same B-wing squadron off the board.

On the Rebel left the first kill was a TIE/ln squadron from the Victory-class, Corrupter, was taken out by an X-wing squadron from Independence.

All along the board a general advance was called, and the game was afoot!

Down the table length at the end of Turn 1
Profundity and Independence closed with Chimaera, all in substantial shadow of Executor.

Close up on the Rebel left, end of Turn 1

The general advance is sounded along the Rebel right. Liberty and two MC30cs rocket toward Executor, possibly on a suicide mission. The other support vessels swarm the station as Home One angles slowly into position.

Close up on the Rebel right, end of Turn 1

End of Turn 1 at the Joint Fleet Command Center

By the end of the opening turn, the Empire had lost 8 TIE/ln squadrons, including the vaunted veterans of Black Squadron. The Rebels were down only a single B-wing squadron. So far.

The honored dead of Turn 1

End of Turn 1 Score

Rebels       65
Imperials   14

Armada Fleet Battle, part 3

This is the third post about my Star Wars Armada full collection fleet battle.

***


I realized a number of things I did wrong during this epic battle. One of them is on display in the first picture below: I did not place the Imperial starfighter squadrons in front of Executor within distance 1-2 of both the huge ship and the Imperial deployment zone. There were a number of minor rules issues I ran across during and after this engagement.

Pregame Notes
I took notes before, during, and after the game. I tried to envision what, exactly, each of these ships and squadrons was supposed to be doing in this massive battle.

Both fleets, arrayed for war

Empire
The main goal is, according to the Station Assault objective card, for the Empire to protect the two stations. With that in mind, my plan was to send the Imperial squadrons deep, to flood around the station to protect it from Rebel starfighters. Executor and Stronghold (the Quasar Fire-class cruiser carrier) would keep a few squadrons aboard, in reserve, and attempt to deploy them later via the Rapid Launch Bays upgrade.

Executor was to target and destroy Liberty and Independence, at a minimum, while the Victory-class star destroyer Warlord would pair with the Chimaera to hammer Profundity and Independence as needed.

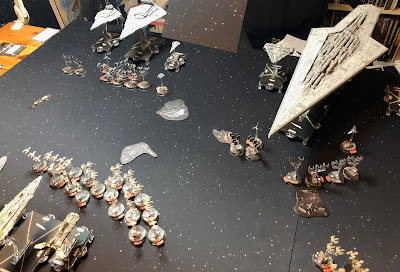
The Imperial right flank (Warlord, Chimaera, Executor)

On the other flank, Devastator and Dominator (a Victory-class on Devastator's left) were tasked with getting close and mauling Rebel ships as Corrupter (the Victory-class between Devastator and Executor) would try to support the larger ship's in protecting their flanks. Two Arquitens-class light cruisers (Thunder Wasp and Centicore) on the far edge would also try to protect the flanks. The Empire does not want any pesky Rebels getting behind their angry white triangles!

The Imperial left flank (Executor, Corrupter, Devastator, Dominator).

Rebels
The Empire wants to keep its deployment zone free of Rebel ships...but Admiral Ackbar would dearly love to get some of the speedier vessels back there as soon as possible. Three CR90s (Dodonna's Pride, Jaina's Light, and Tantive IV) and the MC30c Providence, for instance, are great candidates for this end around maneuver. A number of other ships on the Rebel right flank are poised to engage the station (Nebulon-Bs Yavaris and Redemption, Sphyrna-class Hammerhead Consonance) in support of the wave of starfighters. Home One will bring up the rear, hoping for some sweet double broadsides action late in the game.

View of the Rebel left flank (Home One)

Liberty and a pair of MC30cs (Admonition and Foresight) plan to rush directly at Executor, right down the middle of the board. This is probably goodbye, Liberty!

Liberty, set up right in the middle of the Rebel line
Out on the Rebel left, Profundity and Independence lead the way. My hope is to have Profundity work over Chimaera while Independence arranges for a double broadside against Chimaera and Executor (before likely exploding due to Executor's anger). The Rebel squadrons were tasked with smashing through the Imperial fighter screen and destroying the station.

View of the Rebel left flank (Profundity and Independence)
All is set, and now the pieces are moving!

The next post will follow the action into Turn 1!


Armada Fleet Battle, part 2

This is the second post about my Star Wars Armada full collection fleet battle.

***
Fleet Dispositions

Galactic Empire, Death Squadron, 1995 points
Raider I-class corvette Impetuous         [56]   
Rapid Reload [8]*, Ordnance Experts [4]

Raider II-class corvette Instigator          [63]                    
SW-7 Ion Batteries [5], Disposable Capacitors [3], Gunnery Team [7]

Arquitens-class light cruiser Thunder Wasp          [64]
Enhanced Armament [10]*

Arquitens-class command cruiser Centicore         [77]
Enhanced Armament [10]*, Engine Techs [8]

Quasar Fire I
-class cruiser carrier Stronghold        [81]
Rapid Launch Bays [6], Expanded Hangar Bay [5], Flight Controllers [6], Admiral Chiraneau [10]

Victory I-class star destroyer Dominator               [101]
Quad Battery Turrets [5]*, Assault Concussion Missiles [7], Quad Laser Turrets [5], Ordnance Experts [4], Intel Officer [7]

Victory II-class star destroyer Corrupter                                [110]
Quad Battery Turrets [5]*, Overload Pulse [8], Quad Laser Turrets [5] , Intel Officer [7]

Victory II-class star destroyer Warlord                  [110]
Quad Battery Turrets [5]*, Overload Pulse [8], Quad Laser Turrets [5] , Intel Officer [7]

Imperial I-class star destroyer Devastator             [142]
Heavy Turbolaser Turrets [6], NK-7 Ion Cannons [10], Boosted Comms [4], Phylon Q7 Tractor Beams [6]*, Veteran Gunners [5], Darth Vader (officer) [1]

Imperial II-class star destroyer Chimaera              [182]
Heavy Turbolaser Turrets [6], NK-7 Ion Cannons [10], Reinforced Blast Doors [5], Boosted Comms [4], Ruthless Strategists [4], Skilled First Officer [1], Grand Admiral Thrawn (commander) [32]

Executor II-class star dreadnought Executor          [512]                (Imperial Flagship)
X17 Turbolasers [6], Quad Turbolaser Cannons [10], Heavy Ion Emplacements [9], SW-7 Ion Batteries [5], Boosted Comms [4], Rapid Launch Bays [6], Veteran Gunners [5], Navigation Officer [6], Wing Commander [6], Damage Control Officer [5], Support Officer [4], Emperor Palpatine (commander, overall) [35]

Extra squadrons      [59]


Imperial Fleet Squadron Assignments
Stronghold (Quasar Fire I-class cruiser carrier) [50]
2 x TIE/ln [16], 2 x TIE/sa [18], TIE/ln (Howlrunner) [16]

Dominator (Victory I-class star destroyer) [16]
2 x TIE/ln [16]

Corrupter (Victory II-class star destroyer) [16]
2 x TIE/ln [16]

Warlord (Victory II-class star destroyer) [16]
2 x TIE/ln [16]

Devastator (Imperial I-class star destroyer) [100]
2 x TIE/ln [16], 2 x TIE/sa [18], TIE/in (Saber Squadron) [12], TIE/in (Soontir Fel) [18]
TIE/ad (Darth Vader) [21]
1 x Lambda-class Shuttle [15]

Chimaera (Imperial II-class star destroyer) [93]
2 x TIE/D [32], 2 x TIE/sa [18], TIE/in [11], TIE/in (Ciena Ree) [17]
1 x Lambda-class Shuttle [15]

Executor (Executor II-class star dreadnought) [147]
5 x TIE/ln [40], TIE/ln (Black Squadron) [9], 2 x TIE/sa [18], 2 x TIE/in [22], 2 x TIE/ph [28]
2 x Lambda-class Shuttle [30]

Extra Squadrons [59]
1 x Lambda-class Shuttle [15]
2 x VT-49 Decimator [44]


***


Rebel Alliance, Home One Fleet, 1993 points
Sphyrna-class torpedo corvette Consonance          [41]                   
Sensor Team [5]

Sphyrna-class scout corvette Lightmaker               [46]                   
Sensor Team [5]

CR90A corvette Dodonna’s Pride            [67]   
H9 Turbolasers [8], Early Warning System [7], Engine Techs [8]

CR90A corvette Jaina’s Light                  [67]   
H9 Turbolasers [8], Early Warning System [7], Engine Techs [8]

CR90A corvette Tantive IV                      [67]   
H9 Turbolasers [8], Early Warning System [7], Engine Techs [8]

Nebulon-B support refit Redemption    [63]   
Turbolaser Reroute Circuits [7], Engineering Team [5]

Nebulon-B escort frigate Yavaris           [67]   
XX-9 Turbolasers [5], Engineering Team [5]

Nebulon-B escort frigate Salvation        [67]   
XX-9 Turbolasers [5], Engineering Team [5]

Pelta-class assault ship Refuge             [50]   
Assault Concussion Missiles [7], Toryn Farr [7]

Pelta-
class command ship Haven          [77]   
Boosted Comms [4], Fighter Coordination Team [3], Adar Tallon [10]

MC30c torpedo frigate Admonition       [92]   
XX-9 Turbolasers [5], Expanded Launchers [13]*, Electronic Countermeasures [7], Ordnance Experts [4]

MC30c scout frigate Providence             [99]   
Turbolaser Reroute Circuits [7], Rapid Reload [8]*, Electronic Countermeasures [7], Ordnance Experts [4], Lando Calrissian [4]
 
MC30c scout frigate Foresight               [101] 
Turbolaser Reroute Circuits [7], Rapid Reload [8]*, Electronic Countermeasures [7], Ordnance Experts [4], Tactical Expert [6]

MC80 Liberty-class battle cruiser Liberty               [140]               
Spinal Armament [9]*, X17 Turbolasers [6], Overload Pulse [8], Projection Experts [6], Fire Control Team [2], Tactical Expert [6]

MC75 armored cruiser Profundity          [146]               
X17 Turbolasers [6], Heavy Ion Emplacements [9], Ordnance Pods [3], Redundant Shields [8]*, Point-Defense Reroute [5], Caitken and Shollan [6], Damage Control Officer [5]

MC80 Home One-class assault cruiser Independence          [176]               
Quad Turbolaser Cannons [10], High-Capacity Ion Turbines [8]*, Cluster Bombs [5], Advanced Projectors [6], Fighter Coordination Team [3], Major Derlin [7], General Dodonna (commander) [20]

MC80 Home One-class command cruiser Home One           [170]                (Rebel Flagship)    
Enhanced Armament [10]*, SW-7 Ion Batteries [5], Point-Defense Reroute [5], Projection Experts [6], Leia Organa [3], Admiral Ackbar (commander, overall) [38]

Extra squadrons      [63]

Rebel Fleet Squadron Assignments
Liberty (MC80 Liberty-class battle cruiser) [40]
A-wing [11], Y-wing [10], X-wing (Wedge) [19]

Profundity (MC75 armored cruiser) [75]
A-wing [11], 2 x B-wing [28], 2 x X-wing [26], Y-wing [10]

Independence (MC80 Home One-class assault cruiser) [125]
A-wing [11], A-wing (Tycho) [16], 6 x X-wing [78], 2 x Y-wing [20]

Home One (MC80 Home One-class command cruiser) [134]
2 x A-wing [22], 3 x B-wing [42], B-wing (Dagger Squadron) [15], Y-wing [10], Y-wing (Gold Squadron) [12], X-wing [13], X-wing (Luke) [20]

Extra Squadrons [63]
1 x Millennium Falcon (Han Solo) [26]
1 x Outrider (Dash Rendar) [24]
X-wing [13] (Tierfon)


Friday, September 6, 2019

Armada Fleet Battle, part 1

Welcome to the first of a series of posts detailing my recent Star Wars Armada fleet battle.

***

The Game
My entire collection, facing off in one epic battle! Over my time collecting Armada fleets, I have tried to keep things even, just for such an auspicious occasion. A fleet battle. 2000 points per side. A total of 28 ships (six of them star destroyers) and 75 squadrons would be battling for space supremacy. As this battle would take many more hours than normal, I decided to fight myself! Me versus me. At least I know who’ll win.

The Emperor has made a critical mistake. He has arrived at a secret Imperial facility to watch a demonstration of the newly created TIE Phantom. The research labs are housed in a pair of space stations in an asteroid field orbiting a non-descript star. Rebel Alliance Intelligence got word of the clandestine affair, and a strike fleet under the command of Admiral Ackbar was dispatched. An opportunity to destroy Palpatine, Lord Vader, a Super-class star destroyer, and a secret weapons program was deemed too good to pass up.

All combatants, pre-setup

House Rules
I used two Commander upgrade cards per side in this epic throw-down. I will probably limit myself to one in the future. I have named the ships in this engagement, but I do not actually use the Title type upgrade cards from the Armada game. I also do not like the Fleet Command upgrade type.

The Imperial Fleet, pre-setup (11 ships, 43 squadrons)
The Rebel fleet, pre-setup (17 ships, 32 squadrons)

Setup
The objective for this game was randomly determined: Station Assault. The Rebels would get bonus fleet points for destroying each of two stations. The Imperials would score if the stations remained safe.

With fewer fleet points used (1993 vs 1995), the Rebel Alliance opted for the First Player designation.

The debris fields, asteroids, and stations were placed. Station 1 was on the Imperial left; Station 2 on the Imperial right. Then came the deployment. One ship at a time. Me, trying to outguess myself, and place the best ship in the best position each time. Waiting it out with the big boys, until the lay of the land became clear. I did all the ships first, and did not use squadron placement as a filler for each setup turn. That would have been even more interesting, perhaps.

Between ships and squadrons, the Imperials have 33 drops. The Rebels have 33 as well.

View from the Imperial left flank

View from the Imperial right flank

Long view down the table

Two massive fleets, poised for battle. The Executor and Stronghold held some starfighters in reserve, planning to use Rapid Launch Bays later in the contest.


In the next post: the plans of each combatant!